

 keith
RDP, file transfer included
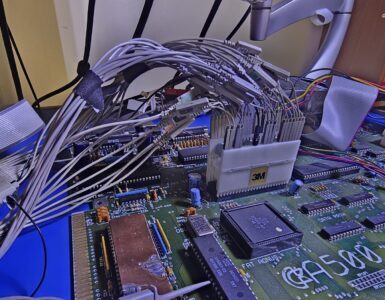
Claude works best whenever it can iterate directly with the hardware, with the computer, with the software — with whatever you are working on. I wanted to have Claude help me interact with my Amiga, and I wanted Claude to help develop software, and then test that software on a real computer. While I have no doubt about the current state of the emulators fidelity, I LIKE involving the hardware, I like using the hardware. While I’ve removed the case, and the keyboard for this work, this late 1980s, early 1990s piece of hardware is still very much alive and working.
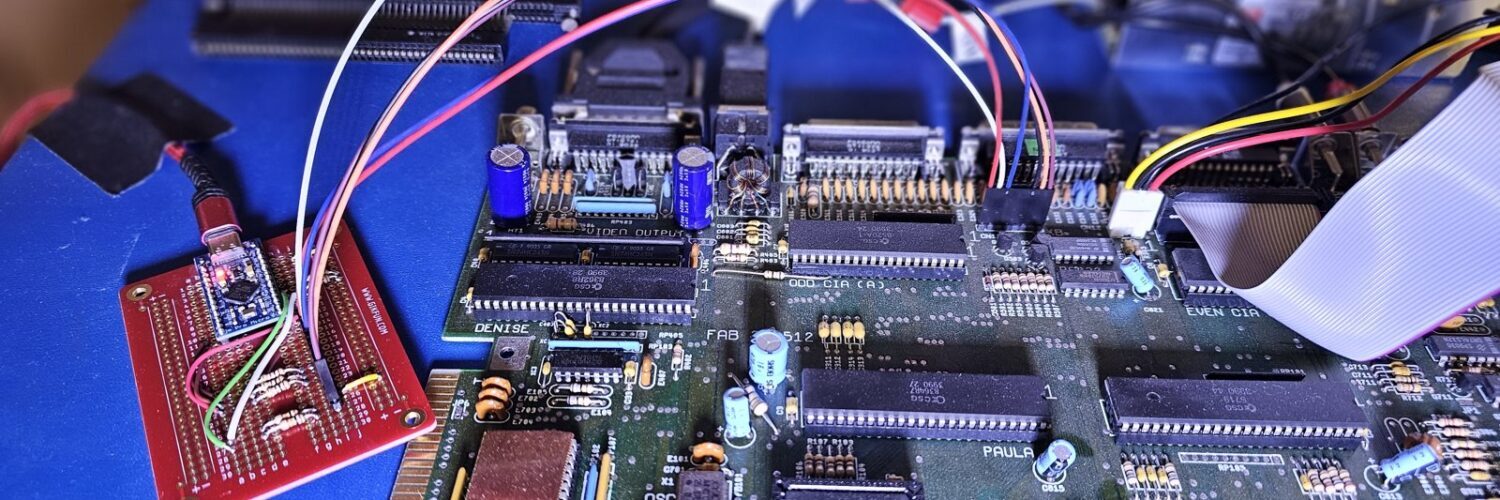
This project enables Claude to remote control an Amiga. I take a small microcontroller, attach it to the keyboard interface. Then I take the video output from the Amiga and run it through a video capture device. This enables Claude to type, but using keyboard mouse shortcuts, also control the mouse. And it enables Claude to see the desktop. It can reboot the Amiga.
I took this a setup further, and created a way to transfer files through the keyboard interface. I’m achieving about 2kB/s which eliminates the need for any networking, serial port, or other communication method. Are there better ways to do this? Yeah maybe, but I think this is cool!
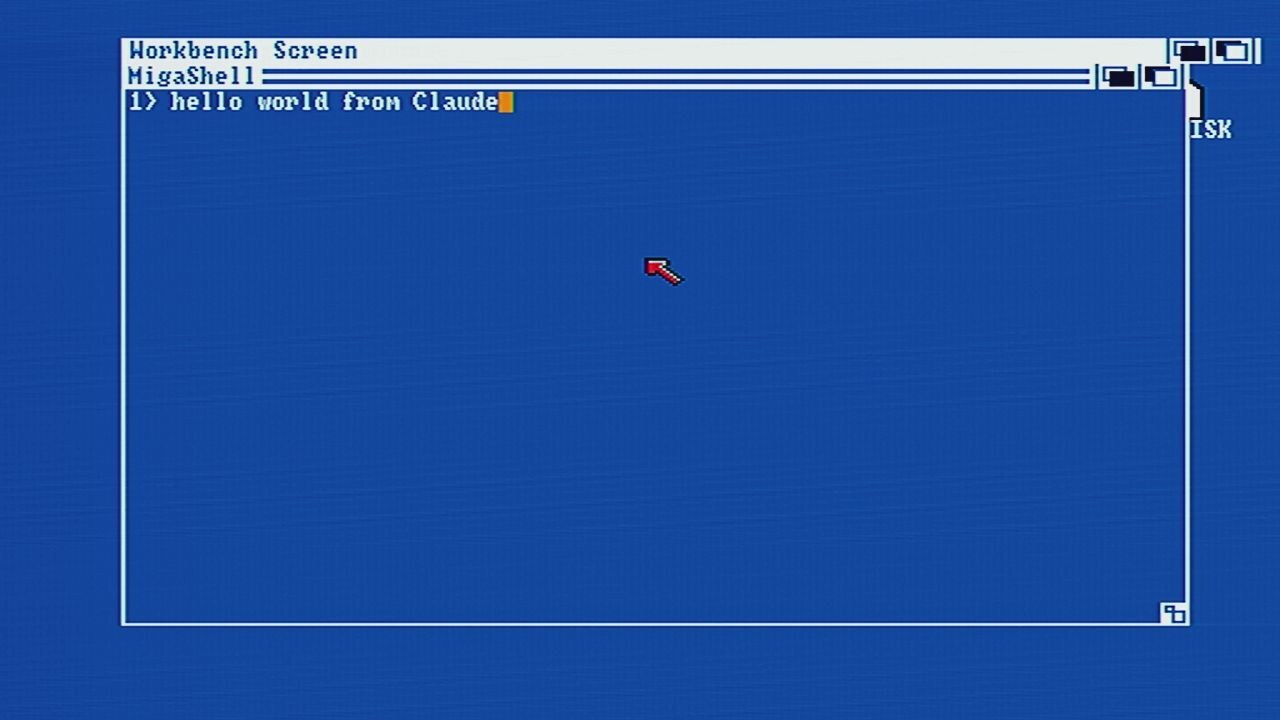
It works. Claude can open a Shell, type commands, pick a disk image on the Gotek, send a program across at about 2 KB/s, run it and read the output. The only new hardware is a small microcontroller board, with six wires going to the keyboard header.
The post covers the hardware, the keyboard emulator, the LinkAgent file-transfer program, and briefly, developing on Windows while testing every build on the real machine.
Code and files: everything is on GitHub at keithgh1/amiga-keyboard-interface: the firmware, schematic and wiring, the PC tools, the LinkAgent source and a ready-to-use LinkAgent disk image. MIT licensed.
Part 1: The hardware
The Amiga
- Amiga 500, PAL, with an ECS 8372A Agnus (as reported by a test program later on).
- Kickstart 1.3 / Workbench 1.3.
- 512 KB chip RAM plus a 512 KB trapdoor expansion. Free memory went from 344,096 to 868,384 bytes, exactly 524,288 more.
- Gotek running FlashFloppy (FF-3.37) as DF0:. Every disk is an ADF image on a USB stick, so disks never have to be swapped by hand.
The rule: leave the Amiga alone
I didn’t want to modify the machine, add a serial cable or install a network card. Everything the Amiga receives from its user comes through the keyboard header, and everything it shows goes out the video port. A PC that can pretend to be the keyboard and watch the video has full control.
Input: pretending to be the keyboard
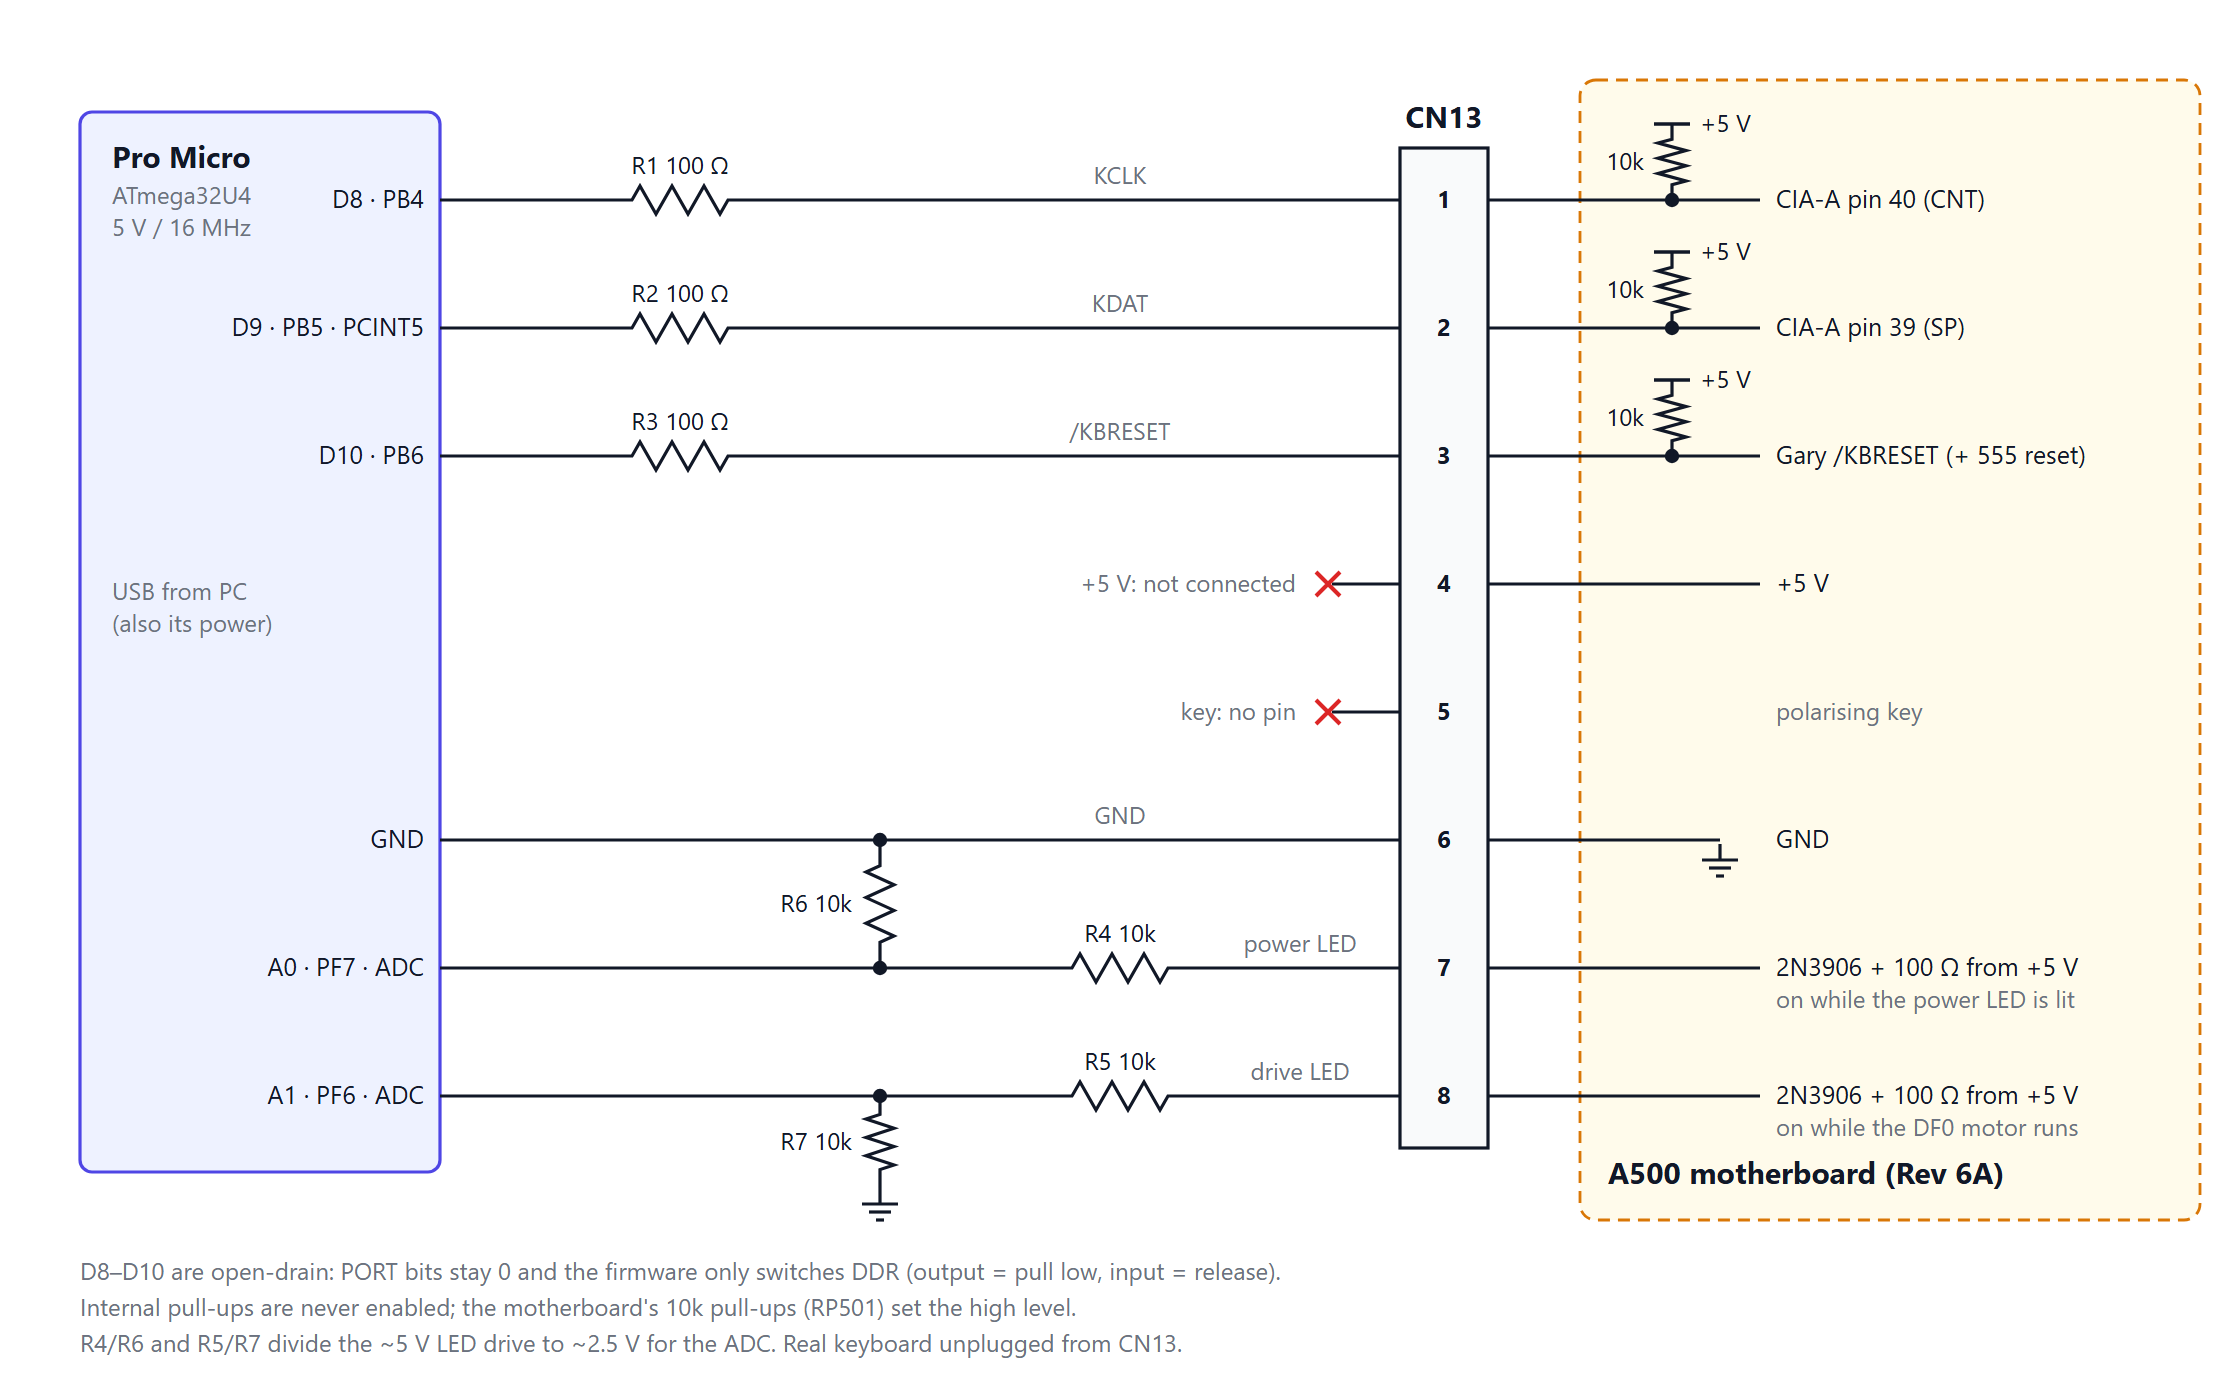
The A500 keyboard plugs into an 8-pin motherboard header, CN13. Published pinouts disagree about whether pin 1 is clock or data, and some boards reportedly have them swapped, so I checked mine with a meter. Pin 1 goes to CIA-A pin 40 (CNT, the keyboard clock) and pin 2 to CIA-A pin 39 (SP, the keyboard data). That matches the Rev 6A schematic. Pin 1 is marked on the PCB, but is on the LEFT hand side with a normal mobo orientation.
| CN13 pin | Signal | Pro Micro | Notes |
|---|---|---|---|
| 1 | KCLK | D8 via 100 Ω | open-drain |
| 2 | KDAT | D9 via 100 Ω | open-drain, also PCINT5 |
| 3 | /KBRESET | D10 via 100 Ω | open-drain, active low |
| 4 | +5 V | not connected | Pro Micro runs on USB power |
| 5 | key | none | polarising key |
| 6 | GND | GND | |
| 7 | power LED | A0 via 10k/10k divider | ADC |
| 8 | drive LED | A1 via 10k/10k divider | ADC |
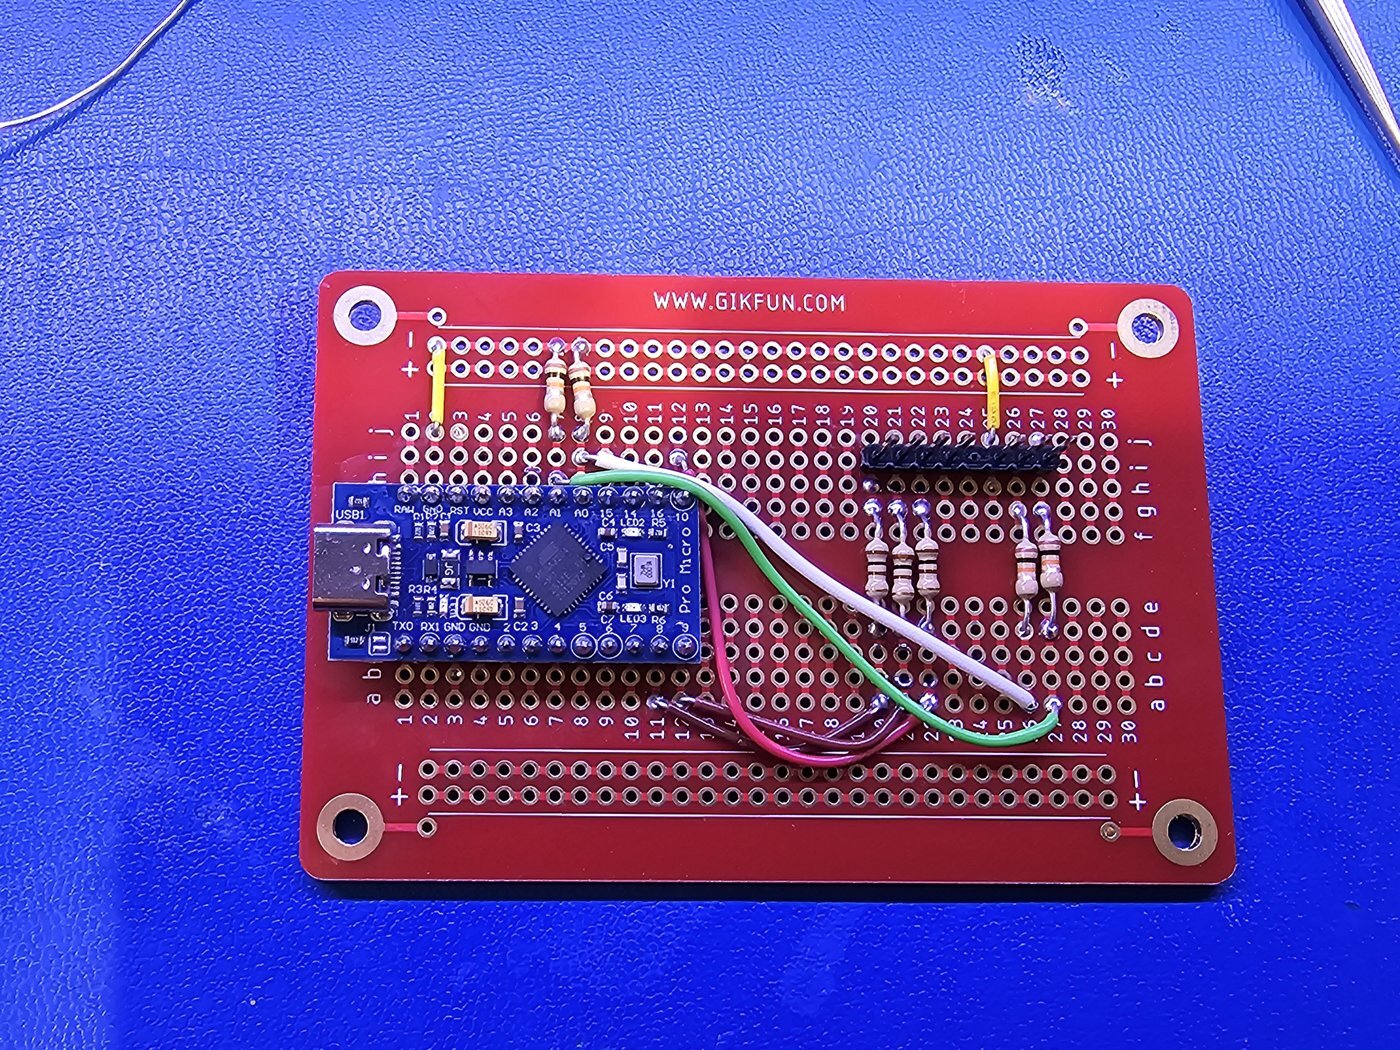
The microcontroller is a Pro Micro ATmega32U4 5V 16MHz development board, the Arduino-compatible module usually listed as “Type-C Pro Micro ATmega32U4 5V 16MHz Module Board”. Any 5 V / 16 MHz Pro Micro will do; avoid the 3.3 V / 8 MHz version. It has native USB. It sits on a GIKFUN protoboard next to a 1×8 header for the cable. The only other parts are three 100 Ω and four 10 kΩ resistors.
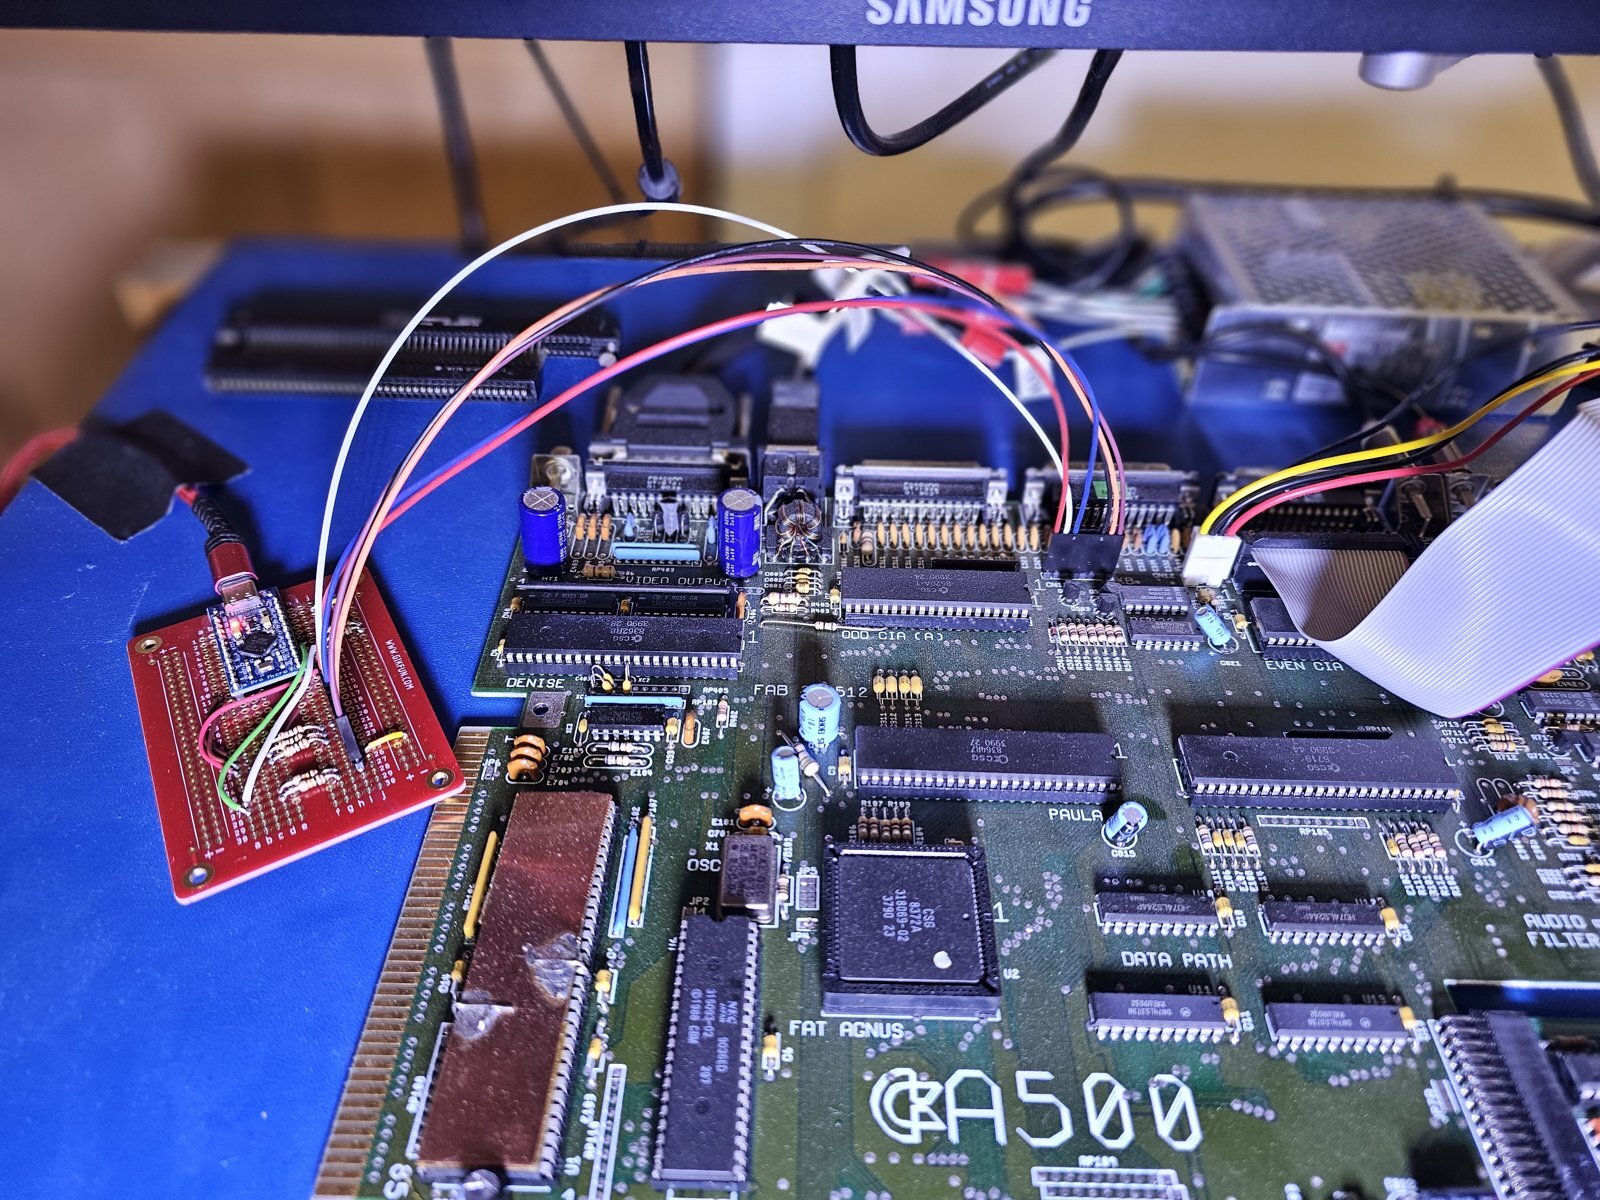
Design choices:
- Open-drain only. The motherboard already pulls KCLK, KDAT and /KBRESET up through 10 kΩ. The firmware leaves each PORT bit at 0 and only switches the pin direction: output pulls the line low, input releases it. It never drives a line high and never enables the internal pull-ups.
- Ground only, no shared 5 V. The Pro Micro is powered from USB. Plug in USB first, then power the Amiga.
- Real keyboard unplugged. A pass-through header was in the first design and got dropped. The A500 keyboard drives /KBRESET from a totem-pole 74LS27, which would fight the Pro Micro every time it pulled reset low.
- LED sense. The A500’s power and drive LEDs live in the keyboard, and CN13 pins 7 and 8 supply them +5 V through PNP switches. With the keyboard unplugged, the Pro Micro reads those pins instead, through a divider that gives about 2.5–2.7 V when lit. This turned out to be essential: the drive LED tells the PC when the disk access has finished.
Output: watching the screen
A custom Amiga-to-SCART cable carries video and audio to a SCART-to-HDMI converter. From there it goes to an EVGA XR1 Lite HDMI capture device, which has an HDMI pass-through: the bench monitor shows the Amiga live while the capture side records the same video and audio. I can watch what Claude is doing on the real screen as it happens.
The XR1 Lite plugs into the PC over USB and shows up in Windows as an ordinary video capture device. It’s what I use, but any HDMI capture device that Windows lists as a camera or capture device should work. tools/capture.py opens it and keeps the latest 1280×720 frame ready for every tool that needs to see the screen:
python tools/capture.py --list         # show the capture devices Windows knows about
python tools/capture.py --device XR1   # leave this running; part of the name is enough
Claude Code can read images, so to look at the Amiga it takes a snapshot and opens the file. That’s slower than a live view, but it suits an agent that works in steps: look, act, wait, look again.
How it fits together
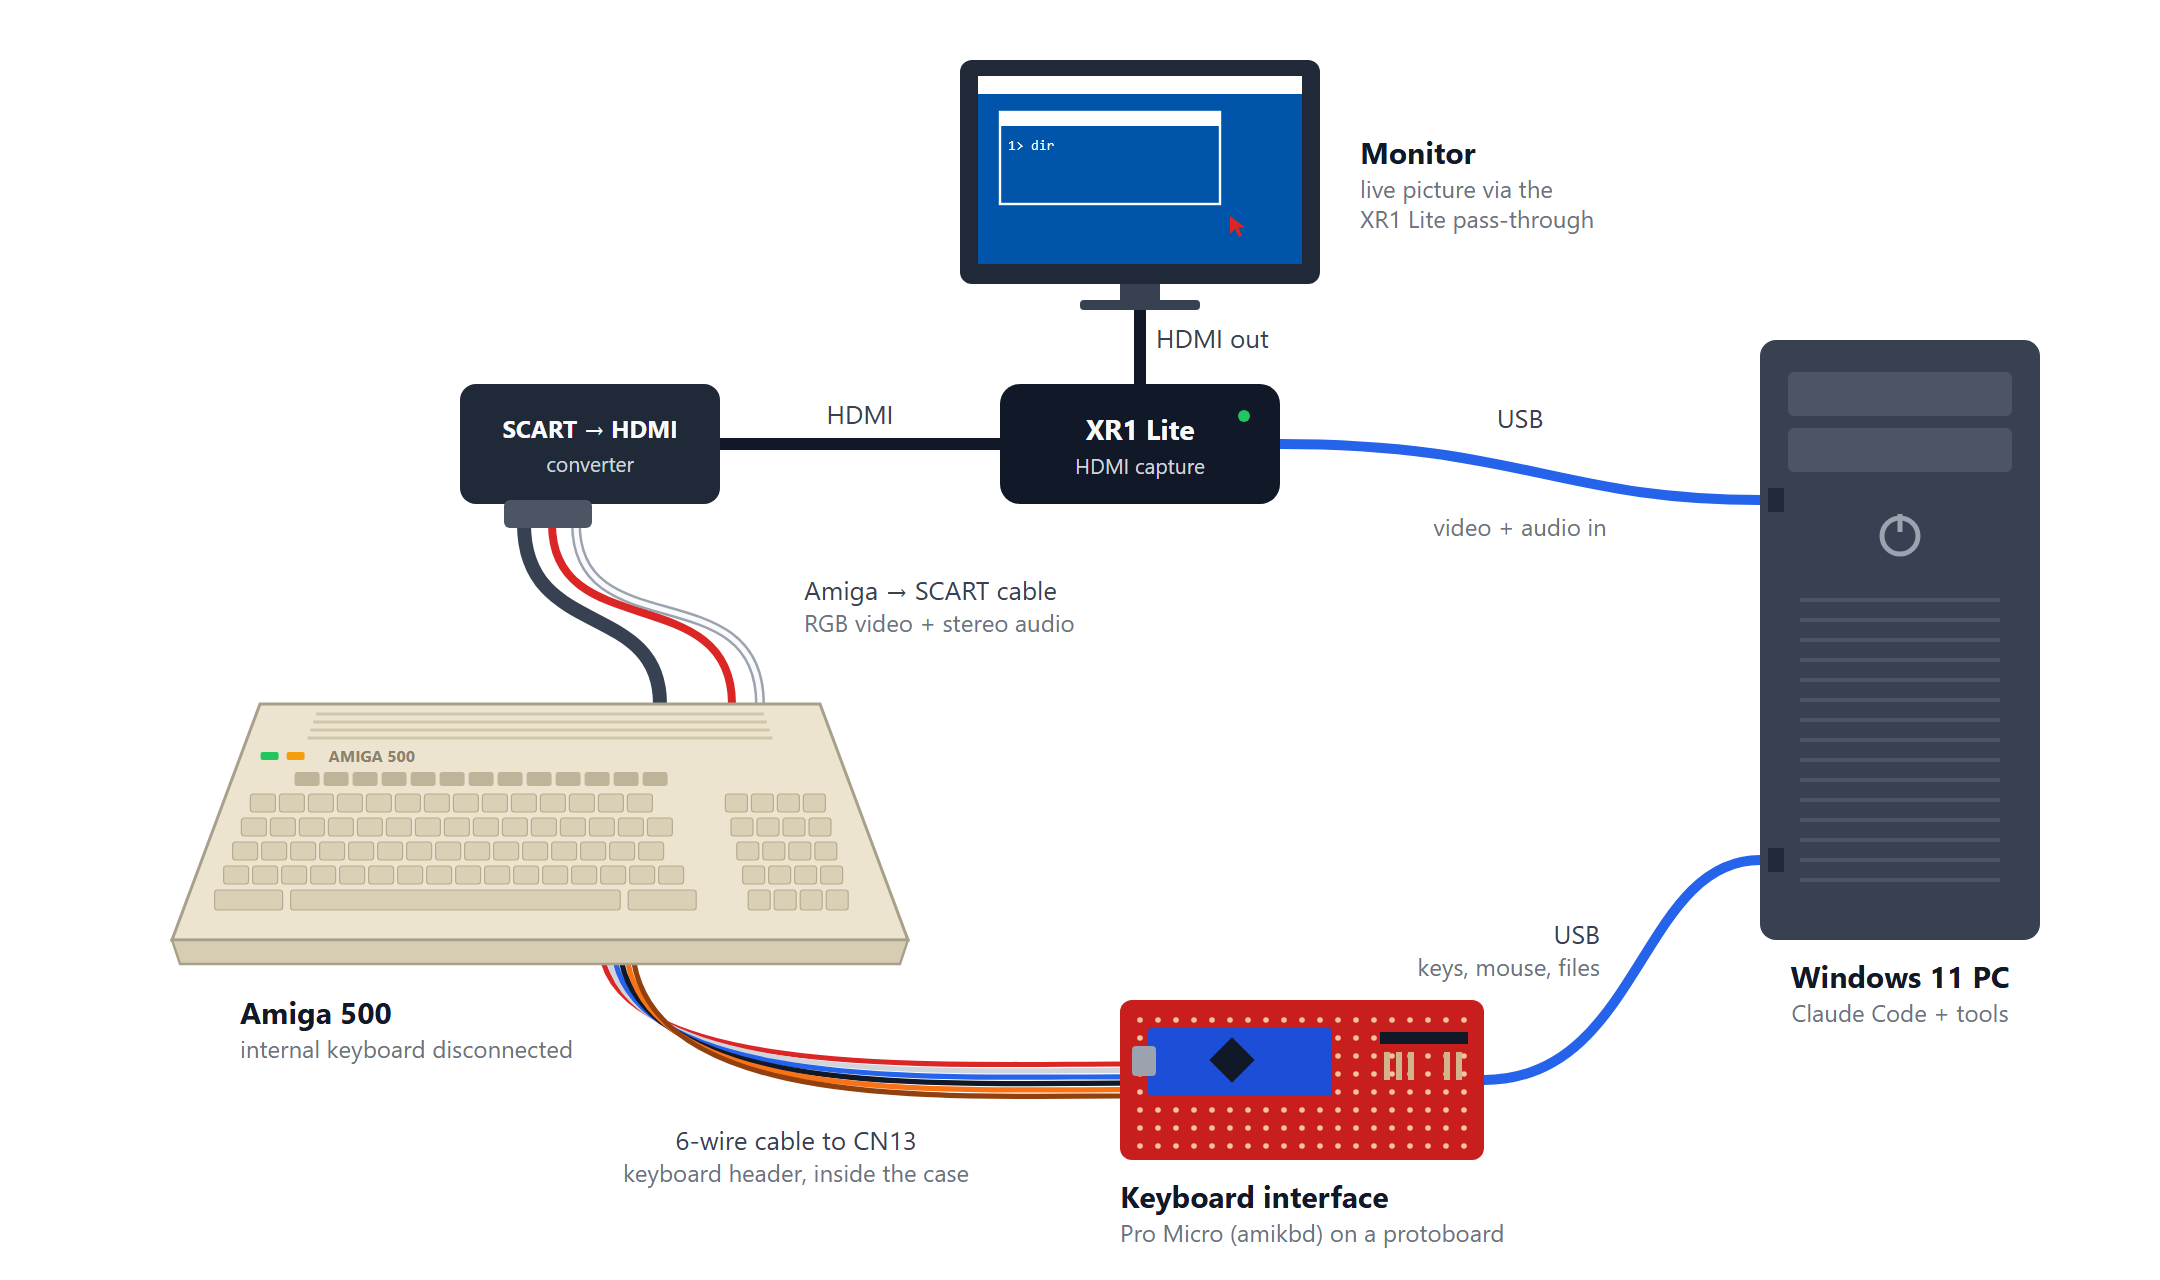
The physical setup: two USB cables go into one ordinary PC. One brings in video and audio from the XR1 Lite. The other goes to the keyboard interface, which carries keys, mouse and files.
The same system in terms of data flow:
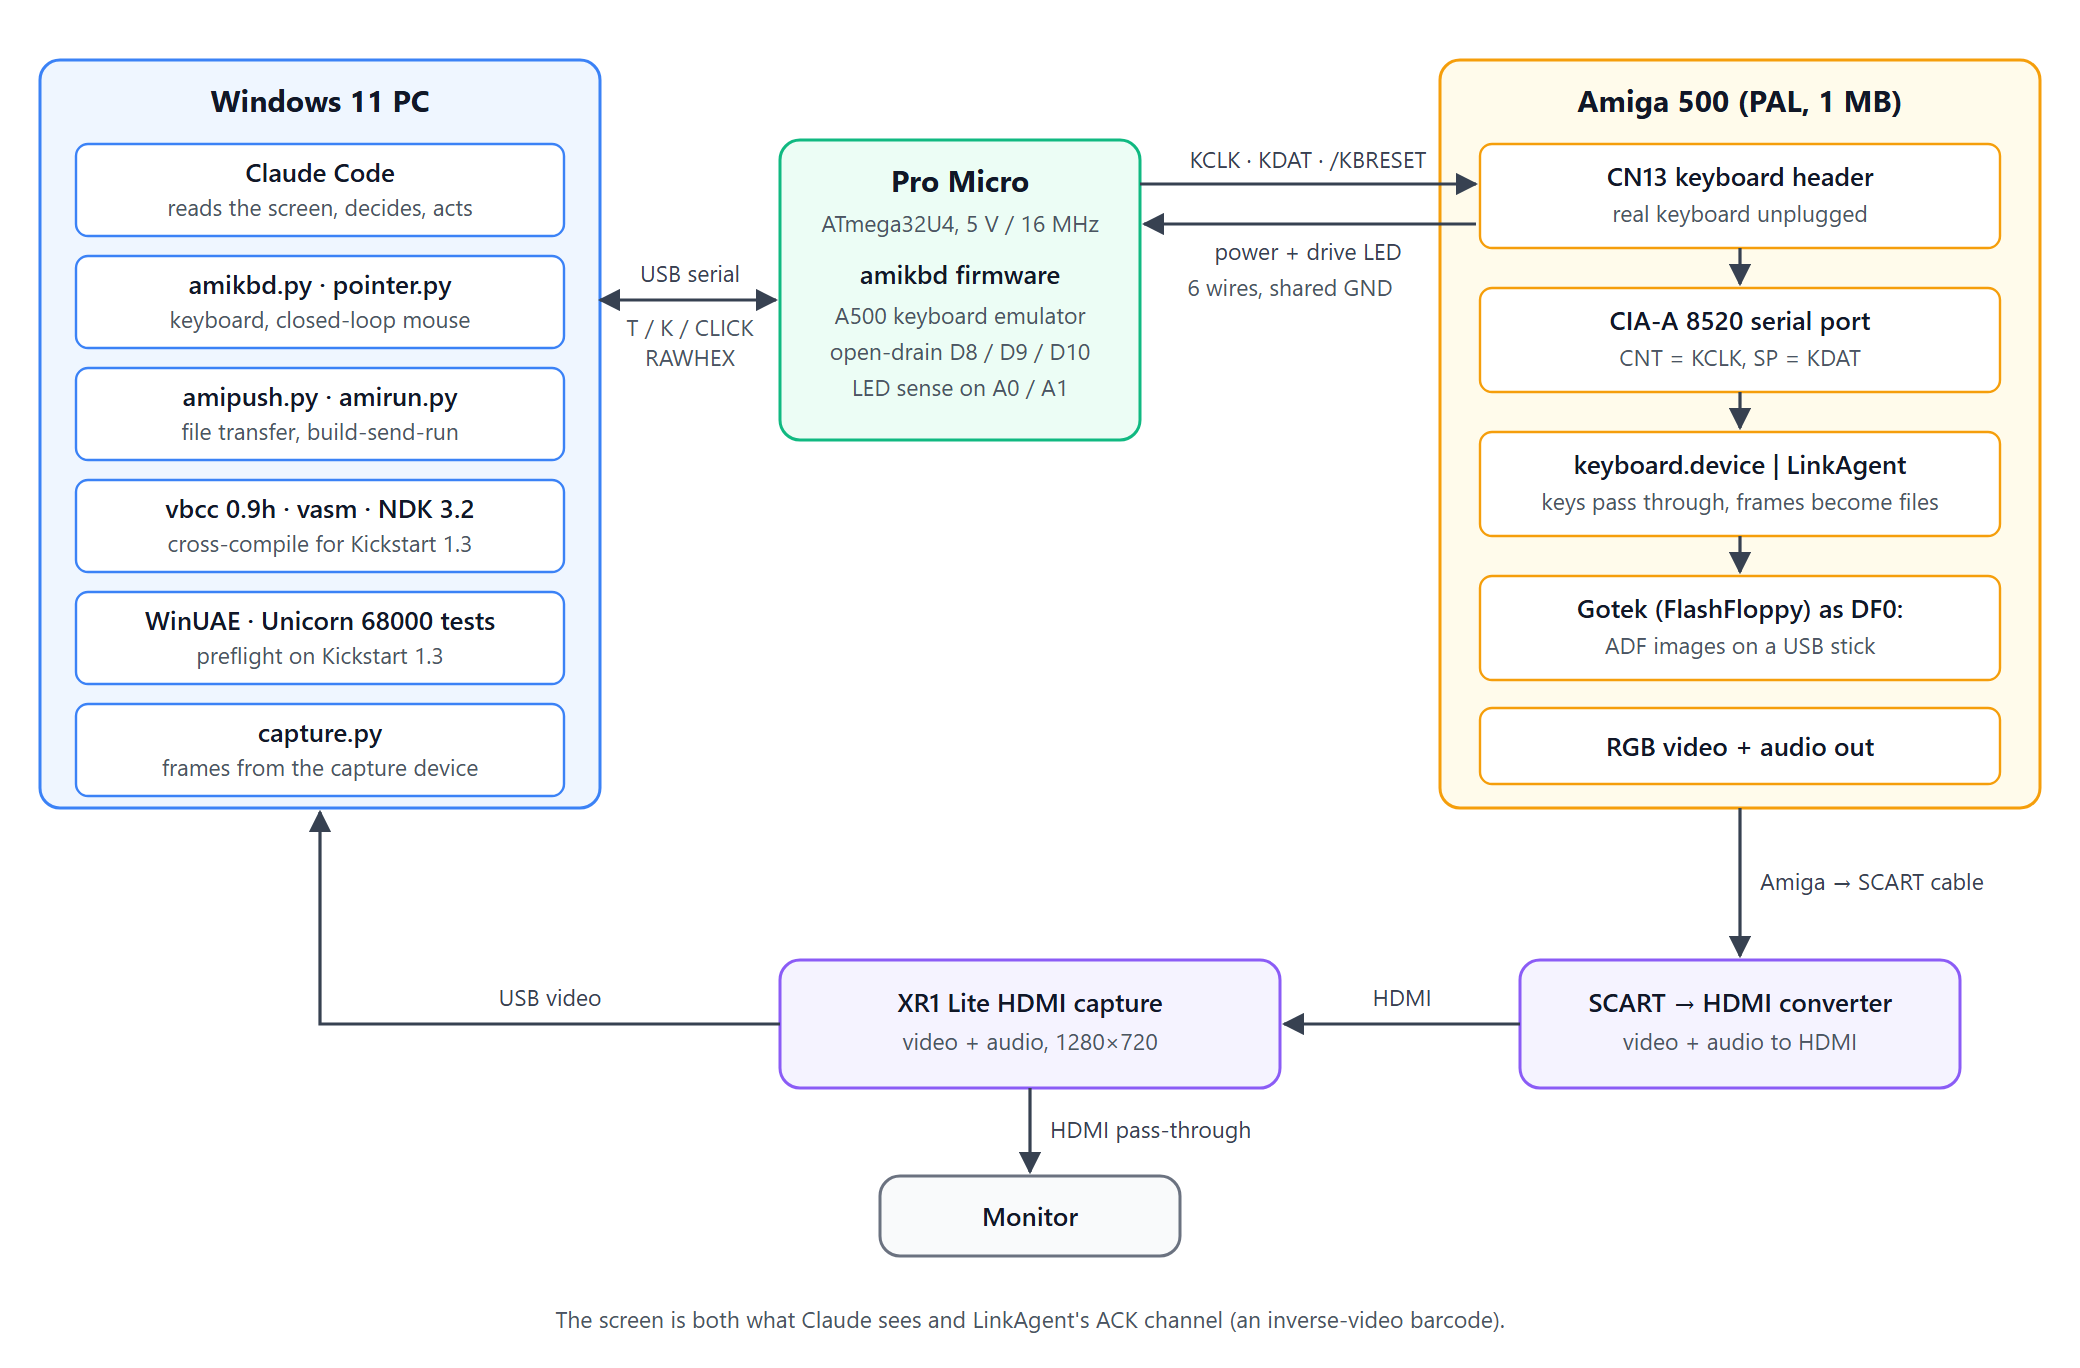
- PC → Amiga: USB serial → Pro Micro → KCLK/KDAT on CN13 → CIA-A serial port →
keyboard.device, or LinkAgent once it’s running. - Amiga → PC: RGB + audio → SCART → HDMI → XR1 Lite (with pass-through to the monitor) → USB →
capture.py→ snapshots. The LED pins add a second, very narrow return path through the Pro Micro’s ADC.
The video path does more than give Claude something to look at. In Part 3 it also carries the acknowledgements for file transfers.
Part 2: The keyboard interface
The A500 keyboard protocol
Appendix G of the Amiga Hardware Reference Manual describes the protocol. Each code is 8 bits: a 7-bit key number and an up/down flag. The lines are active low, and the bits are sent in the order 6-5-4-3-2-1-0-7, so the up/down flag goes last. For each bit, the keyboard sets KDAT, waits about 20 µs, pulls KCLK low for about 20 µs, then waits another 20 µs before the next bit. That’s about 60 µs per bit. After the eighth bit the Amiga acknowledges by pulling KDAT low. Software is told to hold it low for 85 µs.
At power-up the keyboard clocks out 1 bits until the Amiga acknowledges one. Then it sends $FD and $FE, which bracket the keys held down at power-up. If a handshake doesn’t arrive within 143 ms, the keyboard clocks 1 bits until it’s back in sync, sends $F9 (“lost sync”) and sends the key again. The firmware implements all of this.
The A500 also differs from the other Amigas in one way. On those, holding KCLK low for half a second resets the machine. The A500 keyboard instead answers Ctrl + both Amiga keys by pulling a dedicated /KBRESET line (CN13 pin 3) low. That’s why the board has a third open-drain line: the PC can do the three-finger reset itself.
The firmware: amikbd
amikbd is about 800 lines of Arduino C++. It talks over the Pro Micro’s native USB serial port. Each line is one command, and each command gets exactly one OK or ERR reply:
T dir df0:\n          type text (US layout, Shift added automatically)
K RAMIGA+Q            press Right Amiga + Q
D LSHIFT / U LSHIFT   hold / release
R                     hardware reset via /KBRESET
WAITDISK 1500 30000   wait until the drive LED has been off for 1.5 s
S                     status: sync, line levels, LEDs, counters
Asynchronous events start with #, for example # SYNC ok, # LED drive=1 and # RESYNC ok. A few implementation details:
- The handshake is latched in hardware. KDAT is on PCINT5, so the ATmega’s pin-change flag catches the Amiga’s acknowledge pulse even with the interrupt itself disabled. After each byte the firmware checks that flag, so a pulse can’t be missed between samples.
- No clocking a powered-off Amiga. A switched-off A500 holds KCLK and KDAT low. Background sync only clocks while both lines read high, so the board stays quiet until power-on, then syncs during boot by itself.
- Validate, then send.
Tchecks the whole line before sending a single key. A bad character getsERR BADCHAR 7and nothing is typed, so the Shell never sees half a command. - Caps Lock. The A500 sends Caps Lock on key-down only and uses the up/down bit to carry the LED state. The firmware keeps track of it.
A mouse without a mouse
The mouse port isn’t used at all. Intuition already moves the pointer from the keyboard: Left Amiga + cursor keys moves it one step per key press, adding Shift makes the steps bigger, and Amiga + Alt acts as the mouse buttons. The firmware’s MOVE, CLICK L 2, MDOWN and MUP commands are built on these key combinations. Every step is sent as a separate tap, so Intuition never accelerates the pointer and each step is the same size.
Against the capture, a plain step measured 1.75 px on X and 1.275 px on Y. A Shift step was about 178 px on X and 94 px on Y. The ratio differs per axis, so the calibration lives on the PC side.
tools/pointer.py finds the red Workbench 1.3 arrow in a frame and closes the loop: move, grab a frame, measure the remaining distance, correct, until the tip is within ±3 px. That’s far more reliable than counting steps blind.
python tools/pointer.py --goto 650 262   # move the tip to (650, 262) in the capture
python tools/amikbd.py "CLICK L 2"       # double-click the Shell icon
The first live session: power on, # SYNC ok, double-click the install disk, double-click Shell, wait for the disk, type hello world from Claude. For waiting on the disk, 'T dir\n' 'WAITDISK' returns as soon as the drive goes quiet, so Claude never has to guess how long to wait before the next snapshot.
Changing disks without touching the Gotek
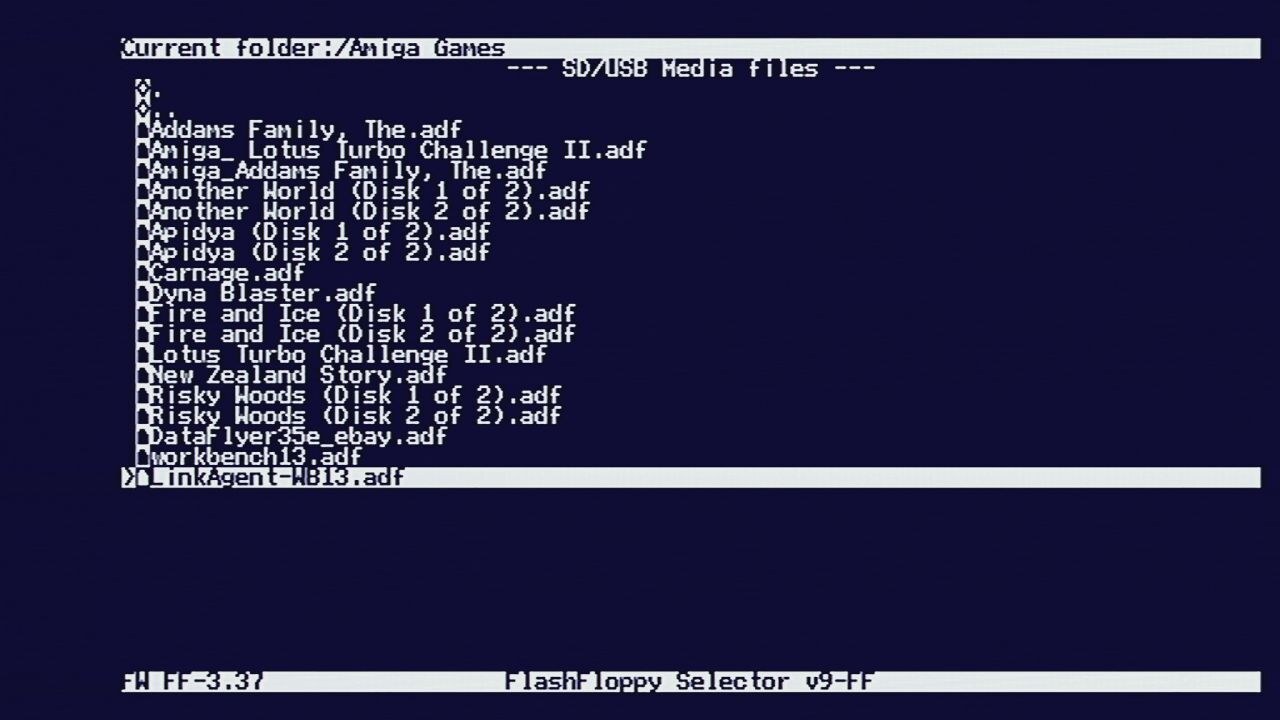
FlashFloppy has a selector that runs on the Amiga from a boot image and works entirely by keyboard: arrows to move, Return to open a folder, F7 to insert the highlighted image and reboot. Since that’s all key presses, Claude can change disks too. It takes a snapshot after each move to check the highlight before pressing F7.
Gotchas
- Keymap. My Workbench disk ran
SetMap i(Italian), so the firmware’s US-layout:came out as@. Changing that line in the startup-sequence toSetMap usa1fixed it. - Quoting. The firmware turns a literal
\ninto Return. Inside a double-quotedpython -c "...", Python converts it into a real newline first, and Return never gets pressed. Use single quotes. - The busy pointer.
pointer.pylooks for the red arrow and can’t see the “zzz” busy pointer. Wait for the busy pointer to go away before positioning.
Part 3: LinkAgent, file transfer over the keyboard cable
With keyboard and mouse working, the next step was getting files onto the machine. The only way in is still the keyboard cable.
Every keyboard frame is a byte
keyboard.device reads each 8-bit frame as a key going up or down. On the wire, though, a frame is just 8 bits clocked into the CIA-A serial port. A program that takes over the CIA’s serial interrupt can treat each frame as a byte of data. The firmware already sent arbitrary codes, so it only needed one new command, RAWHEX. It sends up to 96 raw bytes and reports whether each one was handshaked.
The return channel is a barcode
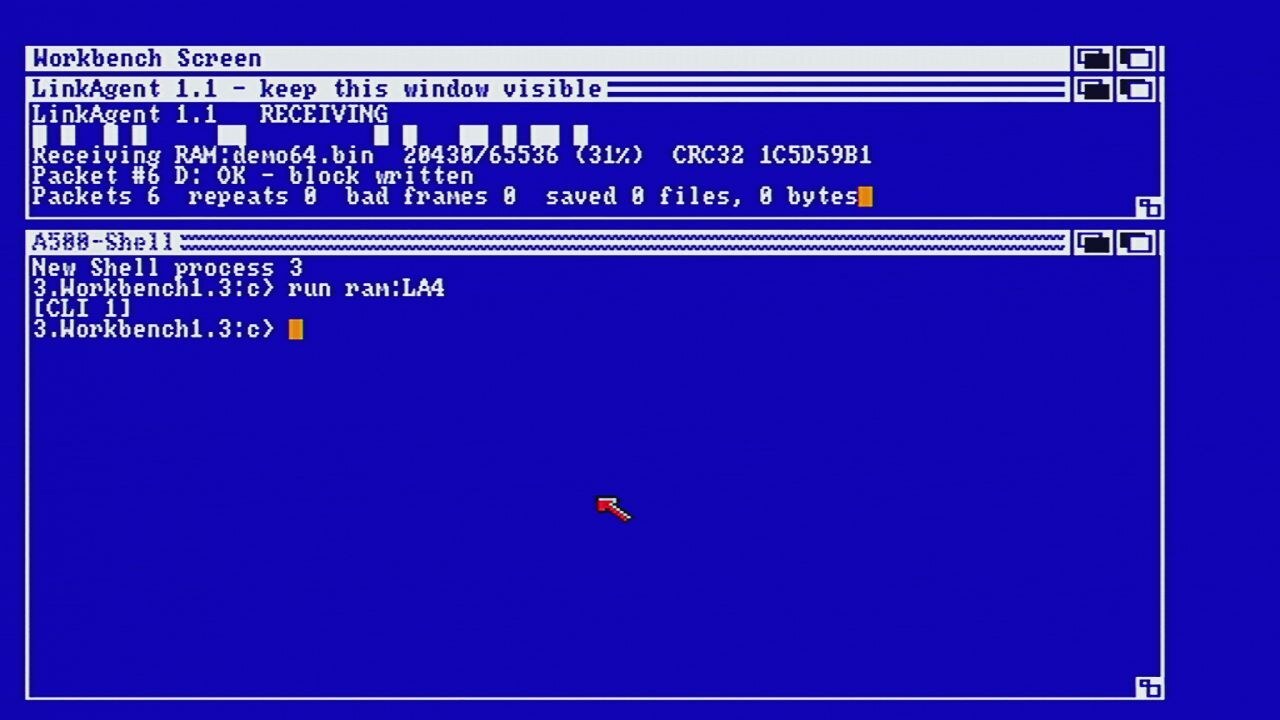
A reliable transfer needs to know whether each block arrived intact. The first design blinked the power LED, using the audio filter bit that dims it, and read that on the ADC. We ended up using a path that already existed: the screen.
LinkAgent opens a small console window and draws its acknowledgement as a row of 40 inverse-video spaces. That’s 5 bytes, MSB first: A5 seq result (A5^seq^result) 5A. The PC finds the stripe in a snapshot and checks the framing bytes and the XOR. It also requires the same pattern on three scanlines before it reads the sequence number and result. If the window is covered or the palette changes, the transfer stops. It never reports a success it couldn’t read.
The agent
LinkAgent is about 850 lines of 68000 assembly, assembled with vasm on the PC into a Kickstart 1.3 CLI program. It needs about 24 KB of memory and no C runtime, and it relies only on what’s in ROM and on a stock Workbench disk.
- It takes over the CIA-A serial interrupt through cia.resource. The original handler is saved and put back on exit. Bytes outside a frame go to the original handler, so normal typing and the keyboard mouse keep working while the agent runs.
- The interrupt routine only stores bytes in an 8 KB ring buffer. CRC checks, disk writes and screen updates run in task context with interrupts enabled.
$70starts a frame,$71ends it, and$72escapes the next byte. The keyboard protocol’s special codes ($F9,$FD,$FE) are escaped as well. A frame holdsseq, cmd, args, CRC32.- The commands are Ping, Begin, Data, End, Abort and Quit. Data goes to
name.part, which is renamed only once the total size and a whole-file CRC32 both match. Existing files are never overwritten. A packet resent after a lost ACK gets the earlier reply again and isn’t written twice.
On the PC side, amipush.py put local.bin RAM:local.bin does the whole job.
Two bugs
Unit tests run the assembled 68000 code in the Unicorn CPU emulator, with stubs for Exec, DOS and the CIA. There are 19 tests today. They cover all 256 byte values, escaping, corrupt frames, resync, sequence-number wrap and overwrite protection. They even render the agent’s console output to a JPEG to test the barcode decoder. Everything passed, and the binary still failed on 1.3:
- “File is not an object module.” In WinUAE, Kickstart 1.3 refused to load it. vasm had written a
HUNK_DREL32relocation, which 1.3’sLoadSegdoesn’t understand. The test loader did accept it, so the tests passed. The fix was vasm’s-kick1hunksoption, plus a build step that rejects any hunk type 1.3 can’t load. - Every transfer ended in a “disk error.” This one only showed up on the real A500. The agent checked
d0after DOSClose(), but on 1.3Close()returns nothing, sod0held leftover data. The files were fine. Now the agent ignoresd0, and the test stub behaves like 1.3.
Getting the agent onto an Amiga the first time takes one disk. Fwiw, I don’t love this requirement, and I think it would be much cooler if the Amiga could bootstrap itself. Stay tuned.
The repository includes LinkAgent.adf, a small disk with only LinkAgent on it. On a one-drive machine, type Run LinkAgent:LinkAgent in a Workbench Shell, insert the LinkAgent disk when asked, and put Workbench back afterwards. I tested that on the A500 with a plain Workbench disk.
Once it’s installed, the agent updates itself over the link. A new build goes to DF0:C/LinkAgent.new, and on the next reset the startup-sequence installs it before starting the agent. No pulling the USB stick out of the Gotek.
Speeding up: 300 B/s to 2,000 B/s
The first working transfer ran at about 300 bytes/s. All of these figures were measured on the A500:
| Change | ms per byte |
|---|---|
| Starting point (60 µs bits, attention pulse, host read stall) | 2.29 |
Host reads in_waiting instead of waiting out a 100 ms serial timeout | 1.29 |
| No attention pulse before transfer bytes | 1.16 |
| 20 µs bits for transfer bytes (keys stay at 60 µs) | 0.86 |
| Agent starts the handshake before decoding, ~50 µs pulse | 0.44 |
Blocks grew to 4,086 bytes, and the sender pipelines them: block n+1 goes out while block n is being acknowledged. The agent only accepts the next offset in sequence, so one OK confirms every earlier block. 64 KB takes 32.6 s (about 2,000 B/s), and an 8 KB program takes 5.5 s. Across 209 KB of test transfers, the firmware counted zero missed handshakes.
Faster bit times failed. 12–20 µs per bit passed CRC-checked transfers. At 10 µs every byte was still handshaked, but frames failed their CRC. Some corrupted bytes looked like end-of-frame codes, and the rest of the data went to keyboard.device as random keystrokes: junk in the Shell and an auto-repeating 2. amipush now refuses anything under 12 µs.
Part 4: Developing on Windows, testing on the A500
Once file transfer worked, a compile-send-run loop was a small step.
- Compiler: vbcc 0.9h (official Win64 binaries) with the
m68k-kick13target, plus Hyperion’s free NDK 3.2 headers from Aminet. The+a500config puts the NDK headers after the 1.3 ones, so only 1.3 functions have prototypes. A call to a 2.0-only function fails at compile time on the PC instead of crashing on the Amiga. - Assembler: vasm, built from source, always run with
-kick1hunks. - Preflight: WinUAE on Kickstart 1.3 for anything risky. It caught the hunk bug.
- The loop:
python tools/amirun.py hello.ccompiles the program and checks its hunks. It then typesdelete ram:helloin the A500-Shell and waits for the drive to go quiet. Next it sends the binary via LinkAgent, typesram:helloand takes a snapshot. The snapshot is the result. A full round trip takes about 17 seconds.
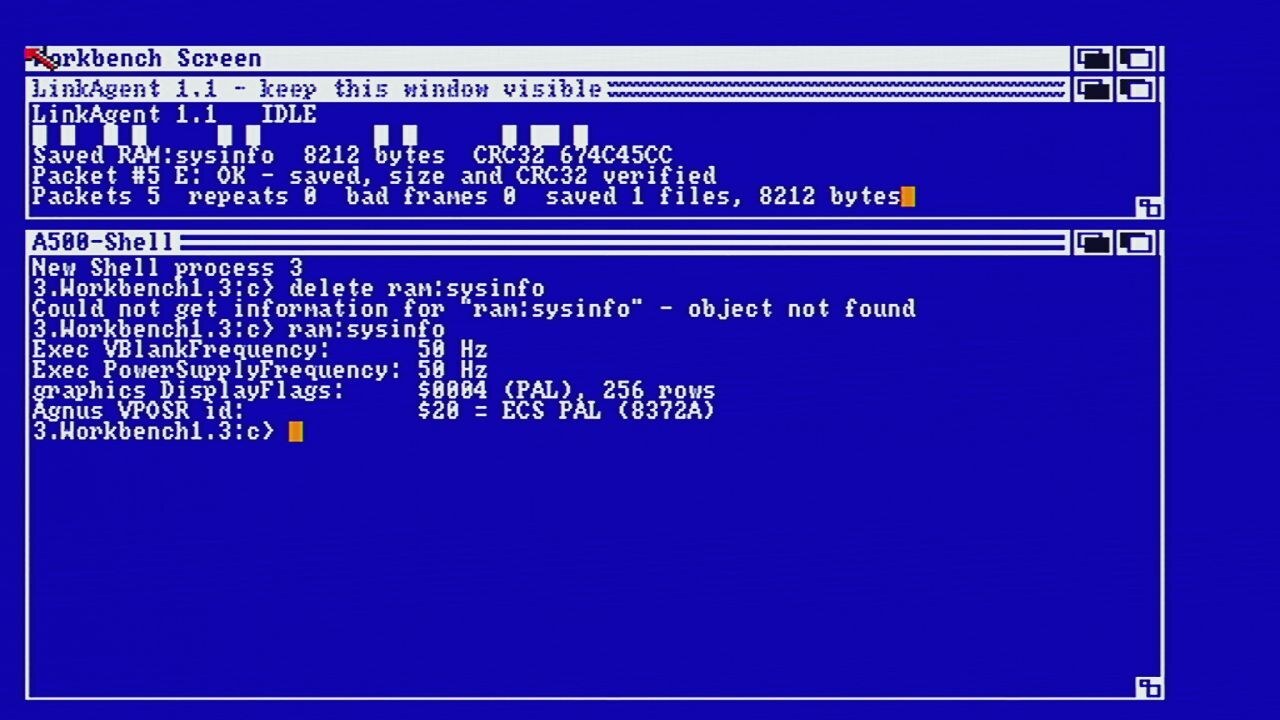
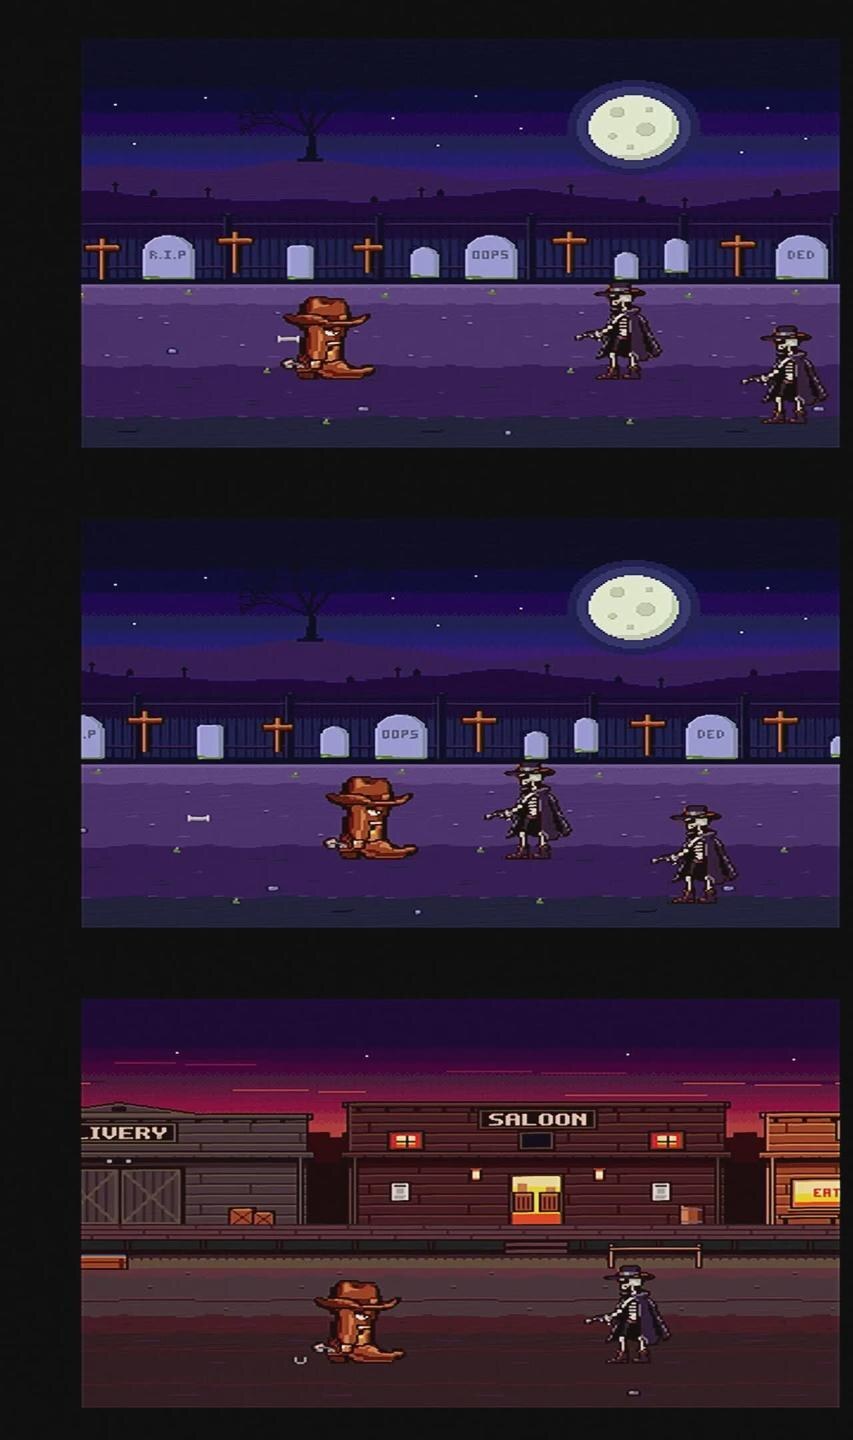
amirun, reporting PAL and an ECS 8372A Agnus. LinkAgent’s status line above it confirms the file’s size and CRC32.Because the loop runs on real hardware, Claude can iterate like a developer: edit, run it on the Amiga, look at the screen, edit again. The biggest project so far is a real-time trailer engine for a made-up western brawler. It has copper-split parallax bands, blitter objects, and a ProTracker module played with ptplayer. Art and script are built on the PC, then pushed to the A500 over this link and checked through the capture.
Wrapping up
Think of it like RDP for the Amiga. The keyboard emulator handles input and the capture handles output. Files go in as keyboard frames, and the acknowledgements come back on the screen. The Amiga itself wasn’t modified at all.
What surprised me was how much of this the Amiga already supported. Intuition’s keyboard mouse made mouse hardware unnecessary. The drive LED shows when the disk is idle. The FlashFloppy selector runs on keys. And cia.resource lets a program borrow the keyboard’s serial port and hand it back cleanly.
The code is at github.com/keithgh1/amiga-keyboard-interface: firmware/amikbd/ (keyboard emulator), devchain/agent/LinkAgent.s (receiver), tools/capture.py, tools/amipush.py and tools/amirun.py (PC side), and disk/LinkAgent.adf to get started.


Add comment